If you’re looking to install a cable railing system, you’ve probably noticed that there are a lot of options to choose from when it comes to selecting the right types of cable and hardware you’ll be needing for your system. In this article, we’ll take you through the basics of what you’ll need, and how to properly plan out your cable railing system.
Cable Railing System Components
Cable railing systems are simple and are composed of only 4 different components: Cable, Tensioners, End Stops, and Post Protectors.
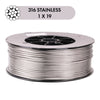
The cable that is most popular for cable railing systems is 1/8” or 3/16” Type 316 Stainless Steel cable with 1x19 strand configuration. Stainless 1x19 cable is a very straight running and low stretch cable, making it perfect for cable railing systems.
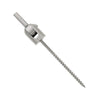
The tensioners and end stops for a cable railing system are the components that are used to secure each end of your cables to your termination posts. An end stop’s job is to hold the cable in place at one end of the run, while the tensioner’s job is to apply tension to the cable at the opposite end of the run.
Post protectors are used to create a barrier between your cable and the raw drilled holes in your posts. They not only offer a cleaner more finished look to your system but will aid in protecting your cable and posts from abrasion.
How To Plan Out Custom Cable Railing
So now let’s jump into the planning process, and your first step is going to be determining how many rows of cable you’ll have for your system.
Determining how many rows of cable that you will be needing for your system will be determined by dividing your handrail height by your cable spacing.
For example, let’s say that the space from the deck surface to the underside of your handrail measures 38”, and per building code requirements for your area, the cables in your system can be spaced no more than 3” apart.
Since 3 doesn’t divide evenly into 38, were just going to divide it by the closest divisible number, which is 36, giving us a grand total of 12 rows of cable. The way that this would lay out on your post would put your first row of cable 3” directly beneath your top rail, and your 12th row of cable 36” below your top rail, leaving you with a 2” gap from your bottom cable to the deck surface.
In some cases, your handrail height measurement, may divide perfectly by your cable spacing. For example, if your handrail height measures exactly 36”, and your cable spacing is 3”, it’s easy to think that you’d be needing 12 rows of cable, however you’d actually be needing one row less, for 11 rows of cable.
In this example, you’ll see that the deck surface is at 36” and so you won’t have the room to install a cable at 36”, you're going to have a total of 11 rows and a perfect 3” cable spacing.
How Much Cable Do I Need?
To determine the total amount of cable that’s required for your deck, you will need to multiply your rows of cable by the total linear foot measurement of your handrails.
So, if you have a grand total of 129ft of handrails receiving cable railing, and 12 rows of cable, then you will need an exact total of 1,548 ft of cable for your system, which you’ll round up to 1,600 feet.
How Many Tensioners and End Stops Do I Need?
To start, first determine how many cable runs are present on your deck.
The term cable run refers to the sections of railing on your deck where your cables span from one termination post to another. Cable runs are separated by 90-degree corners, runs spanning longer than 75 feet, or sharp angle changes. In our example you will see that we have a total of 3 straight cable runs and then two stair runs, giving us a grand total of 5 cable runs.
To determine the total number of tensioners and end stops that you’ll be needing, simply multiple your cable runs by your rows of cable.
For our example you will see that we have 5 cable runs and 12 rows of cable, which results in us having a grand total of 60 tensioners and 60 end stops.
What Types of Components Do I Need?
Tensioners and end stops can be categorized by the way that they secure to your posts, being either thru post components, or lag components.
Thru posts components will require you to drill a hole all the way thru your termination posts, and they are designed to secure to the backside of your post, which means you’ll need to have at least 3” or more of accessibility behind the post to install them. They are known for being the most minimalistic option in their appearance but can be more tedious to install.
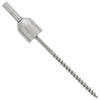
Lag components are designed to thread into or “lag” into the front side of the post, via mounting screws or a threaded lag fitting. They are ideal for use with wood posts, are simple to install, but will be more visible in their appearance.
It’s not uncommon to have to use a combination of both styles of components for your system, so keep that in mind when selecting the tensioners and end stops that you will be needing for each cable run on your deck.
Once you have determined which style of components that you plan to use, your next step will be to select the right tensioner and end stop that you will be needing for each individual cable run that is present on your deck.
Start by assigning each cable run on your deck a number. Doing so will help you keep track of which tensioners and end stops will be used for each individual cable run.
With your cable runs numbered, start with your first cable run and ask yourself these two questions:
Do I have accessibility to the backsides of both termination posts?
Is my cable required to run straight off my post, or will my cable be running at an angle off my post?
Your answer to these two questions will dictate which type of tensioner and end stop will be needed for each termination post for the run, so be sure to select the right type of component that matches the termination post scenario that you have for your run.
Here’s 3 examples to help you get started:
Example 1
On our example deck, cable run 1, has a termination post that’s mounted against a wall, and the opposite termination post is a corner post. In this case, we would be required to use a lag style end stop for the termination post against the wall, which means our thru post tensioner would be installed at the corner post.
Example 2
For cable run 2 on our example deck, our termination posts are corner posts that are shared by cable runs 1 and 3. Since we have open access to the backsides of the corner posts, we can install thru post tensioners and end stops for the run.
Example 3
If we were to use all lag components for our example deck, then we do not need to worry about termination post accessibility, since all our lag components secure to the frontside of the post.
Lastly, keep in mind that in some cases, you may be required to slightly offset your components at a single corner post, where two separate cable runs converge. You can learn more about component combinations at your corner posts in the description below.
Repeat this process for all of the remaining cable runs on your deck, and once finished, tally up the total for each individual tensioner and end stop that will be used for your system.
Accounting for Post Protectors
Post Protectors can commonly be found in 3 different styles: straight, transition, and angled.
Straight Post Protectors: Are used where your cable is entering or exiting your post perfectly straight and is not required to bend.
Transition Post Protectors: Are used when your cable is required to physically bend as it enters or exits your post.
Angled Post Protectors: Are used only at your intermediate pass thru posts in your stair runs, where your cable is traveling thru your post at a consistent angle.
Post Protectors are primarily used in your intermediate pass thru posts, however, may sometimes be used in conjunction with a thru post tensioner or end stop.
We recommend starting with your first cable run and first determine if either your tensioner or end stop will require its own post protector. If so, account for those post protectors first, and then account for the post protectors that will be needed for your intermediate pass thru posts.
If you’re installing only lag style tensioners and end stops, then you will only be accounting for post-protectors being used in your intermediate pass thru posts.
Repeat the same process for all your remaining cable runs on your deck, and once finished, tally up the total for each type of post protector that will be used for your system.
Need help planning out your cable railing system or have a complex deck? Book a complimentary cable railing consultation here.