Chain and lever hoists are most used for applications that require a load to be lifted or suspended overhead. However, when load bearing beams are present, attaching the hoists to the beam can present a challenge, and that's where beam clamps and trolleys come into play. Watch our video for useful information on beam clamps and trolleys, and how you can safely install and put them to use for your application.
Read More to view the text and picture version of this video.
General Safety Information
Be sure to check the width of the beam before making your beam clamp or beam trolley selection.
Always take into consideration the load capacity (working load limit) of the beam and any other lifting devices used in your application.
Never attach a beam clamp or trolley to a beam that is fixed at an angle.
At E-Rigging, we offer 3 different options of Tyler Tool beam attachment products:
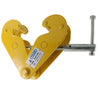
Beam clamps are a simple and effective way to secure loads to beams. They are composed of a set of jaws that open and close by the operation of a threaded handle. The jaws are designed to fit around and onto the flange of a beam. Once tightened to the beam, the clamp will provide a secure attachment point for lifting or suspending devices.
Plain beam trolleys are essential for efficient lifting. They allow you to move loads easily and safely along a beam, without having to lift and reposition the load each time. This can save you time and effort, and it can also help to prevent accidents.
Geared beam trolleys are a type of lifting device that is designed for precision lifting. They are similar to plain beam trolleys, but they feature gears and chains that allow for more precise movement of the load. They’re ideal for Assembly, maintenance, warehousing, and construction and offer advantages over plain beam trolleys including precision, stability, and durability.
Assemble the suspension plate and required number of spacer washers to the inside of the trolley side plates.The dimension between the trolley wheel flanges should be ¼” larger than the beam flange.
Assemble the remaining washers to either side of the trolley side plates, and fit the nuts to the hanger pin.
It is important to note that for geared beam trolleys,
the hanger pin may need to be offset so it will not come into contact with the hand wheel. This can be accomplished by placing the required amount of washers to the hanger pin on both sides of the side plates.
With the trolley loosely assembled, spread the side plates allowing the trolley wheels to be placed over the beam flange, so that the trolley will properly sit on the beam.
Tighten the nuts against the washers.
Insert the safety pins that are provided.
We hope this information has cleared up any questions or concerns you might have about the selection and installation of beam clamps and trolleys for your application. If you have any further questions, please Contact Us.
You can subscribe to our Youtube channel for more information on various rigging topics.