
Swaging Cable Railing with the Crenshaw Swager
The HAAS Stainless REVO and AXIS Cable Railing systems rely heavily on a good swage; having a bad swage runs you the risk of having a tensioned cable fail, which could be dangerous.

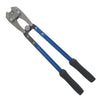
The Crenshaw Swager
First, the Crenshaw Swager is built to last. We went with a special GEOMET® coating that outperforms coatings of other similar tools on the market. The powder coated aluminum handles keep this tool from being too cumbersome despite being designed to apply intense pressure. When we designed the Crenshaw Swager, we wanted to give builders and contractors a better option for cable railing swagers. Picture this – interchangeable dies that let you seamlessly adapt to the cable size you're working with. A game-changer for builders and contractors alike, this feature ensures you have the flexibility to tackle diverse projects without the need for multiple tools.

Changing dies is a breeze – just pop open the handles, grab a flathead screwdriver, and rotate the load pins until the retention pins align with the swager jaws. Swap out the dies, realign, and you're good to go. Efficiency at its finest!

Swaging Technique
The technique explained here and in the video is the same technique whether you’re using 1/8" or 3/16" size cable railing systems.
Cable Insertion: Begin by gracefully sliding the cable into the swage cavity of the fitting. Ensure it snugly rests at the back of the cavity.
Fitting Placement: Open those handles wide, positioning the fitting and cable snugly between the dies.


NOTE: Every fitting has a designated swage area and it's where you need to swage the fitting. The swage area is in between the opening of the swage cavity and the first indentation line on the fitting. Make sure to not swage outside of this area because doing so will lead to a bad swage.
First Swage: Close the handles to initiate the first swage, securing the fitting in place.
To finish: Slightly open the jaws of the swager, give the fitting a 90-degree twist while ensuring it stays within the swage area, and close the handles for the final swage.

The fitting and cable are now permanently fused and ready for a secure and reliable installation. (You can shop the Crenshaw Swager in the featured products below.)
We are constantly updating our video libraries with more How-To content, instructional videos, and tutorials. Check them out here and read more of our How To blogs here.
1 comment
Eric
You seem to be sold out of ss cable. Can any high quality 316 cable be used?