The package containing your HAAS Stainless AXIS Cable Railing System has arrived, and now it’s time to unbox and start your installation. In this article, we’re going to help you start off on the right foot to make sure that your installation goes as efficiently as possible.

Before you do anything, we recommend printing out a copy of your order invoice or pulling it up on a phone or tablet so you can reference it for the component quantities that are on your order.
AXIS Component Pre-Assembly
Your project may not require all the parts in the AXIS System lineup. However, for today’s video, we’re going to break down all the parts and pre-assembly required for all available components.
The cable you ordered will come in boxes just like this. You can go ahead and remove them from their packaging and set them to the side.

The next step is to sort out your components. Each large bag will be marked with an abbreviation that indicates which component and size is inside.


AXIS straight tensioners will come in a bag labeled AXST-1, or AXST-2.
AXIS straight end stops will come in a bag labeled AXSS-1, or AXSS-2.
AXIS pivot tensioners will come in a bag labeled AXPT-1, or AXPT-2.
And finally, AXIS pivot end stops will come in a bag labeled AXPS-1, or AXPS-2.


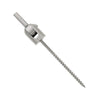
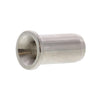
Your AXIS straight tensioners are composed of six different parts: a stainless-steel mounting screw, straight receiver, straight receiver eye, turnbuckle stud, turnbuckle body, and a turnbuckle swage stud. Start off by setting your AXIS straight receivers and mounting screws to the side. These parts will be used during installation.

To pre-assemble the parts for your straight tensioners, start with the turnbuckle body. Thread your turnbuckle swage stud into the left-hand threaded side of your turnbuckle body and your AXIS turnbuckle stud into the right-hand threaded side of your turnbuckle body so that the threads on each of the studs are barely hidden. Lastly, thread your AXIS straight eye onto the end of your turnbuckle stud. Just like the rest of the components in your order, you’ll pre-assemble the remaining quantity of AXIS straight tensioners on your order.

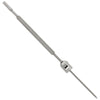
Your AXIS straight end stops are composed of four different parts: a stainless-steel mounting screw, straight receiver, straight eye, and swage stud. Start off by setting your AXIS straight receivers and mounting screws to the side. These parts will be used during installation.

To pre-assemble the parts for your straight end stops, simply thread your AXIS swage studs into your straight eyes. Repeat this for the remaining quantity of straight end stops.

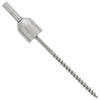
Your AXIS pivot tensioners are composed of seven different parts: a stainless-steel mounting screw, pivot receiver, pivot eye, pivot receiver pin, turnbuckle stud, turnbuckle body, and a turnbuckle swage stud. Start off by setting your AXIS pivot receivers, pivot receiver pins, and mounting screws to the side. These parts will be used during installation.

To pre-assemble the parts for your pivot tensioners, first, locate your turnbuckle body. Thread your turnbuckle swage stud into the left-hand threaded side of your turnbuckle body, and your AXIS turnbuckle stud into the right-hand threaded side of your turnbuckle body so that the threads on each of the studs are barely hidden. Lastly, thread your pivot eye onto the end of your turnbuckle stud. Repeat this for the remaining quantity of AXIS pivot tensioners.

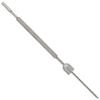
Your AXIS pivot end stops are composed of five different parts: a stainless-steel mounting screw, pivot receiver, pivot receiver pin, pivot receiver eye, and swage stud. Start off by setting your AXIS pivot receivers, pivot receiver pins, and mounting screws to the side. Just like your pivot tensioners, these parts will be used during installation.

To pre-assemble the parts for your pivot end stops, simply thread your swage studs into your pivot eyes. Repeat this for the remaining quantity of pivot end stops.

So now that your AXIS Cable Railing System components have been pre-assembled and accounted for, you’re ready to begin your installation.